Autoplacing the Components
In case of complex circuits you can use the tool  Auto Placer for automatically placing the component in the workspace.
The Auotplacer provide different function as well as option tools for the easy
placement of components . Autoplacer can do the following:
Auto Placer for automatically placing the component in the workspace.
The Auotplacer provide different function as well as option tools for the easy
placement of components . Autoplacer can do the following:
a. It can automatically place all components outside of the page boundaries and sort them according to parts.
b. It allows user to relocate single components and manually place them according to selected placement cell patterns.
c. It allows user to identify other components connected to selected component on the page and manually place them according to selected placement cell patterns.
d. It allows to automatically place components connected to selected one.
e. It allows to automatically place all connected components starting with those connected to selected component.
f. It allows to build groups of components and relocate these groups to desired position on the page.
g. It allows to automatically build new groups of components using the currently present group as template and relocate this newly created group to desired position on the page.
Packing the Components
If the PCB of the circuit has to be designed, then the components
need to be packed. Packaging is nothing but information that the system requires
to identify the Package, associated to Part placed on the Schematic. For example,
symbol **7404 is associated to package DIP14 in layout. Only packed components
are front annotated to layout.
EDWinXP supports three types of packing.
Autopackaging
Select Tools | Component |  Pack/Unpack Component and select
  Autopackaging from the option list. An Automatic Packaging window appears
as shown in Fig. 4.9. Click Execute button. The packaging information
appears along with each of the packed components. Automatic packaging assigns
first free number to the last placed component belonging to the same group.
Autopackaging from the option list. An Automatic Packaging window appears
as shown in Fig. 4.9. Click Execute button. The packaging information
appears along with each of the packed components. Automatic packaging assigns
first free number to the last placed component belonging to the same group.
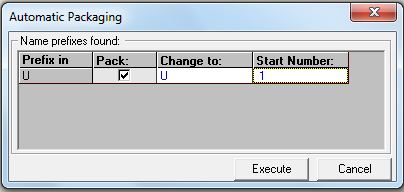
Fig. 4.9
| ***Automatic update of PCB Layout with changes are made in Schematic. Conversely Back annotation refers to automatic update of Schematic with changes made in PCB Layout. **7404 has six INV gates, each
gate is referred to as a group. Parts which have the same kind of groups
are called Homogeneous Parts while Parts like 4000 which have different
groups (3NOR and INV)are called Heterogeneous Parts. |
Instant Packaging
Instant packaging is invoked using the tool under Preferences
menu in Schematic Editor-->Instant Packaging which helps to pack components
as soon as they are loaded to the workspace. All the constituent groups of the
part will be loaded. This is particularly useful while loading connectors into
the Schematic.
Interactive Packaging
Interactive packaging is done using the tool
Pack/ Unpack Component. Right click and select this tool and click on
the component pin that is to be packed. A window “Component Packaging”
pops up (Fig. 4.10). Click ACCEPT button. This method allows individual
packaging of components.

Fig.4.10
Packaging Using Property Window
Packaging can also be done using the property window. This is a form of manual packing, as the user has to select the component (CTRL + Click) to be packed and activate the property window of that component. The steps are as follows for packing component by component:-
1. Select the component by bulleting (CTRL+Click).
2. Right click and select properties to get the Property Sch Component window pops up.
3. In the property window right click on the component and use pack option.
The steps to pack all the components at one instant:-
1. Select Info->General or Ctrl + F
2. Multiple select the components (Schematic component).
3. Right click and select properties to get the Property Sch Component window pops up.
4. In the property window right click on the schematic component and use pack option.